


A beautiful Christmas wreath doesn’t have to start with an expensive wreath form. If you have a sturdy wire clothes hanger, you already have the basic frame for a simple DIY wire hanger Christmas wreath.
This is one of those Christmas crafts that can be customized almost endlessly. Cover the hanger with ornaments for a colorful statement wreath, wrap it with greenery for a more traditional look, or combine greenery, ribbon, bells, and a few ornaments for something that feels collected and classic.
It’s also a useful project when you’re decorating on a budget because the hanger provides the structure and you can often use leftover decorations from your Christmas bins.
The trick is getting the shape right, attaching everything securely, and keeping the wreath light enough for the hanger frame and hanging method.
Below, I’ll walk through a simple greenery-and-ornament version, along with plenty of variations if you want to make the wreath your own.
Why Use a Wire Hanger for a Christmas Wreath?
A wire hanger gives you a ready-made metal frame that can be reshaped into a circle.
It has a few advantages:
- Inexpensive
- Easy to find
- Lightweight
- Easy to customize
- Built-in hook can sometimes be incorporated into the design
- Works with leftover Christmas decorations
It’s especially useful for lightweight decorative wreaths.
However, a clothes hanger isn’t the same as a purpose-made heavy-duty wreath frame. Keep the finished wreath reasonably light, and choose another frame if you plan to attach heavy decorations.
What Kind of Wire Hanger Works Best?
Use a basic sturdy metal clothes hanger that can be reshaped without immediately snapping.
Avoid:
- Plastic hangers
- Heavily coated hangers that are difficult to bend
- Damaged or badly rusted wire
- Extremely thin hangers that won’t support the decorations
Wire can be sharp once it’s bent or cut, so handle it carefully.
Wear eye protection when cutting or manipulating wire, and consider work gloves to protect your hands.
DIY Wire Hanger Christmas Wreath Supplies
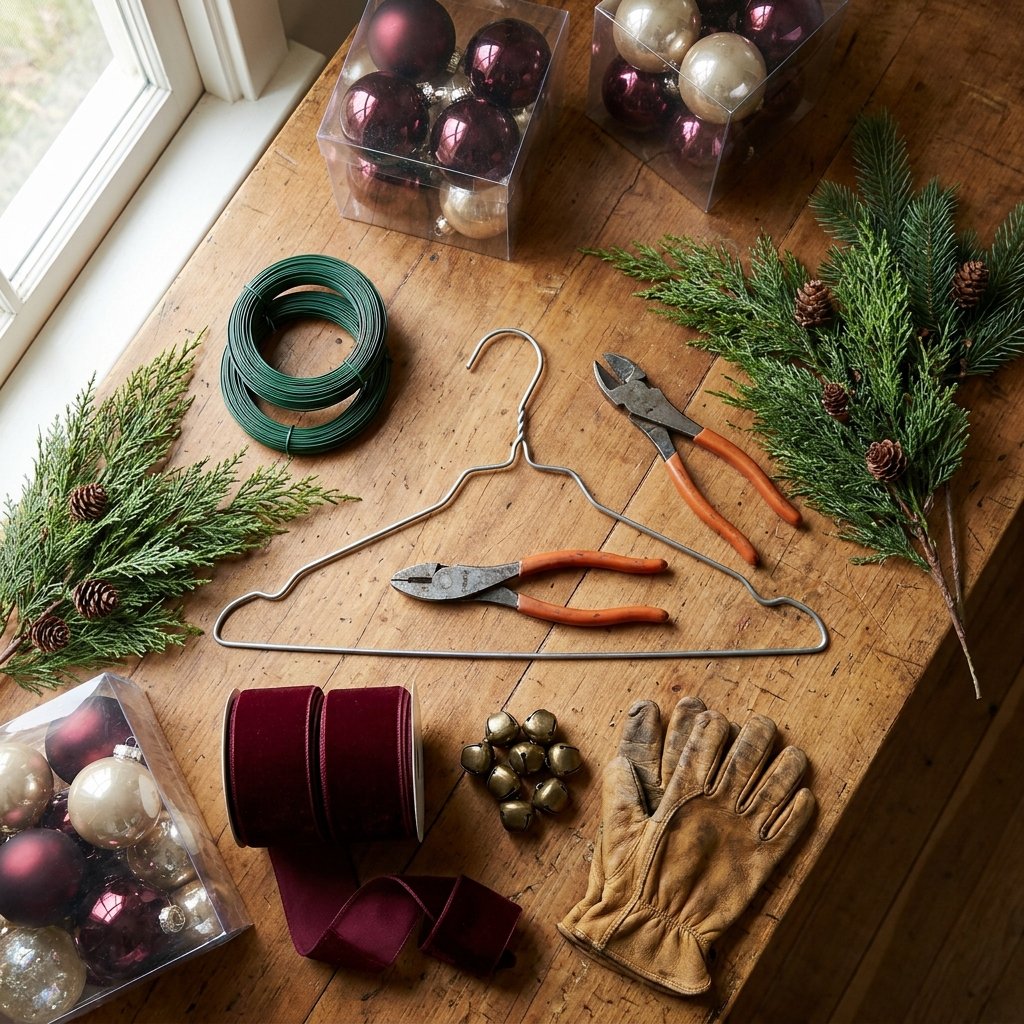
For a greenery-and-ornament wreath, you’ll need:
- Sturdy wire clothes hanger
- Faux Christmas greenery
- Lightweight ornaments
- Floral wire or appropriate craft wire
- Wire cutters
- Pliers
- Ribbon
- Optional bells
- Optional pinecones
- Optional berry picks
- Optional floral picks
- Appropriate wreath hanger or hanging hardware
If you’re using hot glue for small decorative details, you’ll also need a glue gun and glue sticks.
Hot glue can cause burns, so work carefully and keep it away from children and pets while hot.
Step 1: Shape the Wire Hanger Into a Circle
Start with the hanger lying flat on a sturdy work surface.
Hold the hook area and gradually pull the bottom corners outward.
Work around the hanger slowly until the triangular shape becomes approximately circular.
It doesn’t need to be perfect.
Once the wreath is covered with greenery, small irregularities won’t be visible.
Using your hands and pliers as appropriate, continue adjusting until the frame is relatively even.
Don’t repeatedly bend the same point back and forth unnecessarily because metal can weaken with repeated bending.
Step 2: Decide What to Do With the Hanger Hook
You have a few options.
You can leave the hook in place and incorporate it into the hanging method or hide it behind a large bow.
Alternatively, the hanger may be opened or modified depending on the wreath design.
If you cut wire, remember that the newly cut ends may be very sharp.
Use suitable wire cutters and eye protection, and bend or cover sharp ends so they cannot scratch someone or damage the door.
For a beginner-friendly wreath, keeping the existing hanger structure intact is often simplest.
Step 3: Plan Your Wreath Before Attaching Anything
Before securing greenery, lay your materials loosely around the hanger.
Decide whether you want:
- Full wreath
- Minimal greenery
- Asymmetrical design
- Ornament-heavy wreath
- Traditional greenery wreath
Also decide where the bow will go.
Possible placements include:
- Top
- Bottom
- Lower left
- Lower right
Planning first helps prevent ending up with all the largest decorations in one area.
Step 4: Attach the First Pieces of Greenery
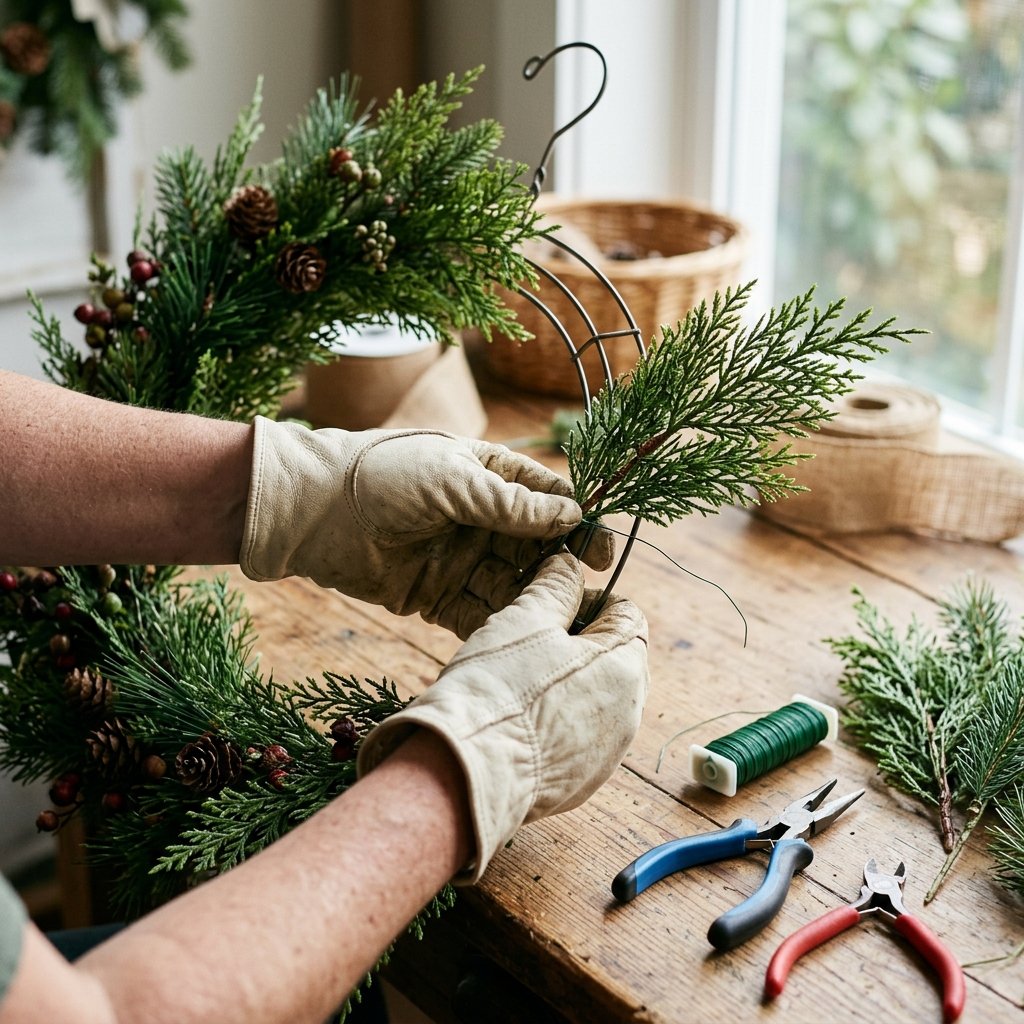
Start with a few faux evergreen stems.
Lay the first stem along the hanger so the foliage follows the curve.
Secure the stem to the wire frame with floral or craft wire.
Wrap securely enough that the greenery doesn’t slide, but avoid crushing or damaging the stems.
Tuck sharp wire ends toward the back of the wreath and bend them safely inward.
Add the next stem so it overlaps the attachment point of the first.
Continue working around the frame.
Step 5: Continue Layering Greenery
Keep the greenery pointing generally in the same direction as you work around the circle.
Each new piece should cover the exposed stem and attachment point from the previous piece.
Mixing greenery can make the wreath look more natural.
Try combining:
- Pine-style stems
- Cedar-style stems
- Fir
- Juniper-inspired greenery
- Eucalyptus-style foliage
You don’t need equal amounts.
One greenery type can make up the base while a second is used as an accent.
Step 6: Check the Wreath From a Distance
Once the hanger is mostly covered, hold the wreath up.
This is much easier than trying to judge the shape while it’s lying flat.
Look for:
- Bare sections
- Uneven areas
- Exposed wire
- Overly thick sections
- Greenery pointing in awkward directions
Add a few individual stems where necessary.
Don’t aim for perfect symmetry.
A little variation usually makes the greenery look more natural.
Step 7: Add Lightweight Christmas Ornaments
Now you can introduce color.
Choose lightweight ornaments so you don’t put unnecessary stress on the hanger frame.
Depending on your color palette, try:
Traditional
Red + green + gold
Elegant
Burgundy + forest green + champagne
Neutral
Cream + brown + brass
Soft
Blush + sage + champagne
Colorful
Red + pink + green + blue + gold
Attach ornaments securely with floral wire or another appropriate method.
Avoid relying on a loose ornament cap if the ornament will be hanging outdoors or somewhere it may be bumped.
Step 8: Group Ornaments Instead of Spacing Them Perfectly
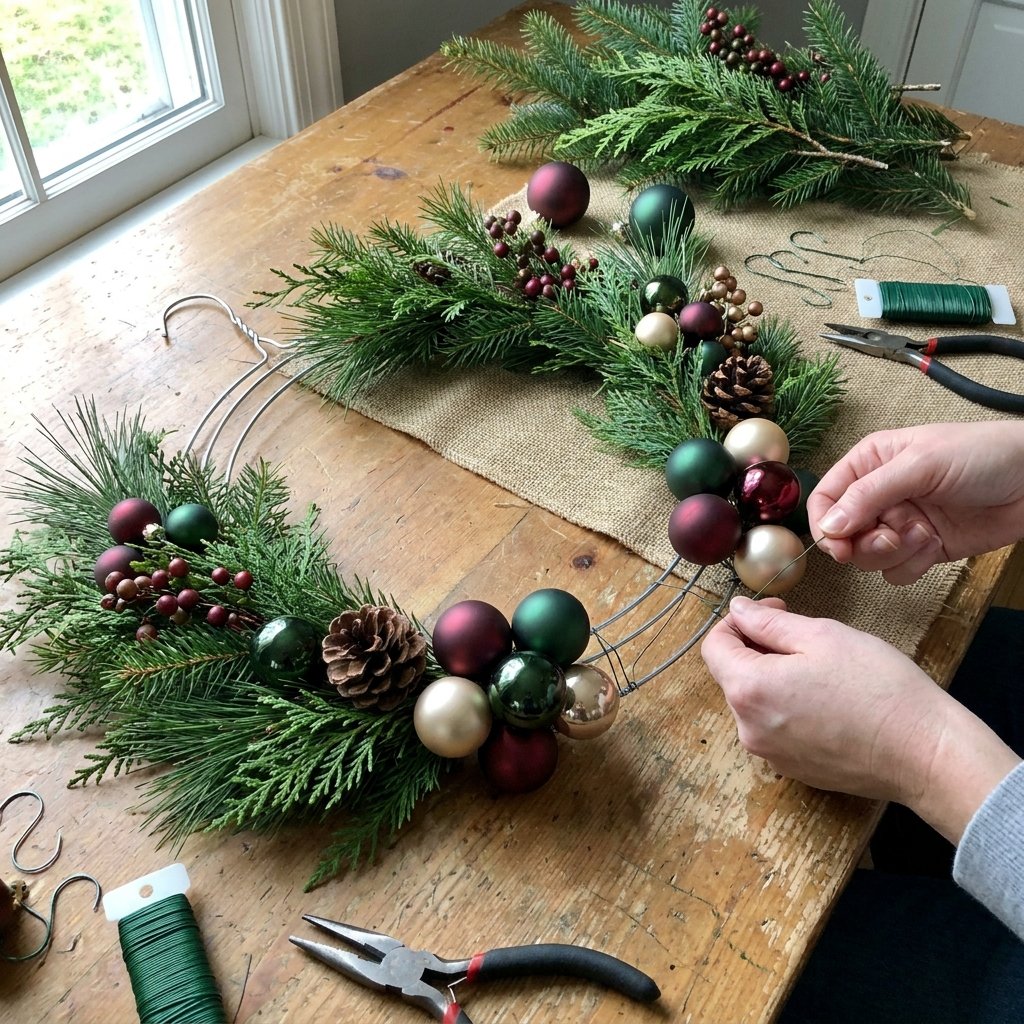
Rather than placing one ornament every few inches, try small clusters.
For example:
- One medium ornament
- Two smaller ornaments
Use different finishes:
- Matte
- Shiny
- Ribbed
- Glittered sparingly
Clusters can make the wreath feel fuller while using fewer ornaments.
Leave plenty of greenery visible.
Step 9: Add Decorative Picks
This step is optional, but picks can add dimension.
Try:
- Metallic leaves
- Berry stems
- Frosted branches
- Pinecones
- Additional greenery
Insert them between the evergreen branches and secure them to the frame where needed.
Keep the weight balanced.
If one side becomes significantly heavier than the other, the wreath may hang crooked.
Step 10: Add Bells
A small bell cluster can give the wreath a traditional Christmas look.
Tie lightweight decorative bells near:
- Bottom center
- Bow
- Lower side
Use ribbon or wire appropriate for the weight.
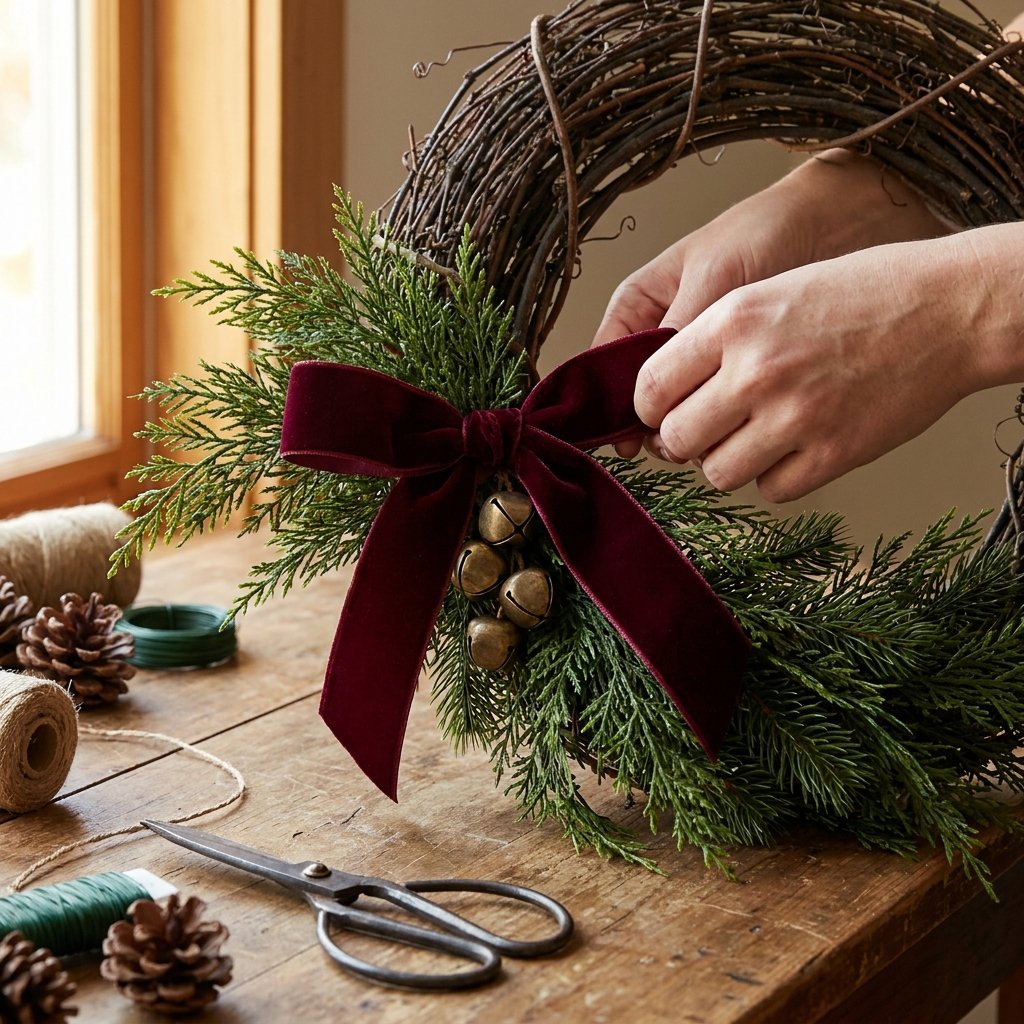
Antique brass-toned bells look beautiful with deep green greenery and burgundy velvet ribbon.
Step 11: Make a Christmas Bow
Ribbon can completely change the style of the wreath.
For an elegant look, try velvet.
For traditional Christmas decor, use:
- Red velvet
- Plaid
- Tartan
For a neutral wreath:
- Brown velvet
- Cream ribbon
- Linen-look ribbon
For easier shaping, wired ribbon can be helpful.
Create a simple bow and leave the tails slightly long.
There’s no need to make an enormous bow unless you want it to be the focal point.
Step 12: Attach the Bow
Secure the bow directly to the wire frame rather than only attaching it to a loose branch.
This helps keep it stable.
Fluff the loops.
Then adjust the tails so they fall naturally over the greenery.
If you’re using a wired ribbon, gently shape the tails rather than pulling them perfectly straight.
Step 13: Hide the Hanger Frame
Inspect the wreath carefully.
Look from:
- Front
- Side
- Slightly below
If you can still see large sections of the wire hanger, tuck in additional greenery.
Don’t worry about completely hiding the back.
The front and sides are what matter most once the wreath is hanging.
Step 14: Secure Loose Decorations
Before hanging the wreath, gently shake it over a table or work surface.
Nothing should fall off.
Check:
- Ornaments
- Bells
- Picks
- Bow
- Greenery
Trim or safely bend any exposed wire ends.
If the wreath will hang on an exterior door, remember that opening and closing the door can repeatedly jostle the decorations.
Secure everything accordingly.
Step 15: Hang Your Christmas Wreath
Choose hanging hardware appropriate for:
- Finished wreath weight
- Door material
- Hanging location
- Indoor or outdoor use
A purpose-made over-the-door wreath hanger may work for some doors, provided it doesn’t interfere with the door closing, weather stripping, locks, or seals.
Other doors may require different hardware.
Follow the hanger or adhesive product’s stated weight limit and surface requirements.
Don’t assume an adhesive product will bond safely to every paint, finish, glass, metal, or exterior surface.

Easy Ornament Wire Hanger Christmas Wreath
Another popular version skips the greenery and covers the hanger with ornaments.
The concept is simple: ornaments are arranged around the wire frame until the hanger is hidden.
However, the exact construction depends on your ornament type and hanger design.
If ornaments are being threaded directly onto wire, their caps must be secure enough for the method.
Some inexpensive ornament caps can pull off easily.
Consider reinforcing them appropriately or choose ornaments designed for secure hanging.
Use lightweight, shatter-resistant ornaments when practical, especially for a door that moves frequently.
How to Make an Ornament Wreath Look Full
The secret is varying ornament size.
Use:
- Large ornaments
- Medium ornaments
- Small filler ornaments
As they gather around the frame, rotate them in different directions.
You don’t want all the ornament tops facing forward.
Smaller ornaments can visually fill gaps between larger ones.
For a more collected look, mix finishes while keeping the colors coordinated.
Red and Green Wire Hanger Christmas Wreath
For a traditional Christmas wreath, use:
- Evergreen base
- Red ornaments
- Green ornaments
- Gold accents
- Red velvet ribbon
You could also add a few plaid details.
Keep gold as an accent rather than making every ornament metallic.
Burgundy and Green Christmas Wreath
For something a little richer, try:
- Dark evergreen
- Burgundy velvet ribbon
- Deep green ornaments
- Champagne ornaments
- Brass-toned bells
This combination feels traditional without relying on bright red.
It also works beautifully with warm wood doors.
Neutral Wire Hanger Christmas Wreath
For a quieter look, use:
- Greenery
- Cream ribbon
- Wood ornaments
- Pinecones
- Brass-toned bells
Natural textures keep a neutral wreath interesting.
If you’re using real pinecones, make sure they’re clean, dry, and securely attached.
Colorful Ornament Wreath
A wire hanger can also become a playful ornament wreath.
Try mixing:
- Pink
- Red
- Green
- Turquoise
- Gold
Keep one finish or repeated color running throughout so the wreath still feels cohesive.
This can be a great way to use mismatched ornaments from previous Christmas seasons.

Minimal Wire Hanger Wreath
You don’t have to cover the entire hanger.
A simple wreath can use greenery only along the bottom half or one side.
Add:
- Small velvet bow
- Bell cluster
- Several berries
Leave some of the metal frame visible intentionally.
This works best when the frame itself looks neat and the design clearly appears intentional rather than unfinished.
How to Make a Wire Hanger Wreath Look More Expensive
A few details can elevate inexpensive supplies.
Mix Greenery
Two or three foliage textures look more natural than one uniform garland.
Limit the Color Palette
Choose three or four colors.
Use Velvet Ribbon
A little velvet adds rich texture.
Use Fewer, Larger Details
One beautiful bow can have more impact than ten tiny decorations.
Mix Matte and Shiny Ornaments
Texture creates dimension.
Hide Attachment Points
Tuck wire and ties beneath greenery.
Don’t Overfill the Wreath
Leaving greenery visible creates visual breathing room.
Can You Use Real Greenery?
Yes, but it behaves differently from faux greenery.
Fresh evergreen may:
- Dry out
- Shed needles
- Change color
- Need replacement
- Be heavier than artificial stems
If using fresh greenery, choose material appropriate for wreath-making and consider the climate and hanging location.
Keep drying natural greenery away from heat and ignition sources.
If the wreath will be used indoors, monitor it as it dries.
Can You Hang a Wire Hanger Wreath Outside?
Possibly, depending on the materials.
The metal frame itself may tolerate some exposure, but decorations may not.
Check whether your:
- Ribbon
- Ornaments
- Adhesives
- Greenery
- Hanging hardware
are suitable for the conditions they’ll encounter.
Sun, rain, wind, humidity, and freezing temperatures can affect craft materials.
A covered porch generally provides more protection than a fully exposed exterior door.
How to Store a DIY Wire Hanger Wreath
Don’t crush the wreath into a small box.
Use a wreath storage container or a large box that allows it to lie relatively flat.
Before storing:
- Remove any loose decorations.
- Make sure the wreath is dry.
- Reshape ribbon.
- Protect delicate ornaments.
- Label the container.
Store it somewhere protected from excessive heat and moisture when possible.
DIY Wire Hanger Christmas Wreath Safety Tips
This is a relatively simple craft, but wire requires care.
- Wear eye protection when cutting or manipulating wire.
- Use wire cutters designed for the type of wire you’re cutting.
- Wear work gloves if needed to protect your hands.
- Keep cut wire ends pointed away from your body.
- Bend or cover sharp ends.
- Keep wire scraps away from children and pets.
- Use caution with hot glue.
- Place hot glue guns on a stable, heat-resistant surface.
- Follow adhesive instructions.
- Don’t make the wreath too heavy for the hanger frame.
- Use hanging hardware rated for the finished weight.
- Keep decorative wreaths away from open flames and high heat.
- Avoid blocking door locks, handles, peepholes, or required exits.
- Secure small ornaments carefully in homes with young children or pets.
Common Wire Hanger Wreath Mistakes
Trying to Make the Circle Perfect
The decorations will hide small irregularities.
Using Decorations That Are Too Heavy
Remember that the hanger is a lightweight frame.
Leaving Sharp Wire Ends Exposed
Always bend or cover them safely.
Attaching Decorations Only to Greenery
Secure heavier items to the actual frame.
Using One Texture of Greenery
Mixing foliage creates a fuller look.
Adding Too Many Colors
A limited palette often looks more intentional.
Making the Bow Too Large
The bow shouldn’t hide half the wreath unless that’s the look you want.
Ignoring the Back
Make sure wire ends won’t scratch your door.
Using the Wrong Hanging Hardware
Match the hanger to the wreath weight and door surface.
FAQ About DIY Wire Hanger Christmas Wreaths
Can you make a Christmas wreath from a wire hanger?
Yes. A sturdy metal clothes hanger can be reshaped into a circular frame for a lightweight Christmas wreath.
How do you shape a wire hanger into a wreath?
Gradually pull and reshape the triangular hanger into a circle, working around the frame rather than sharply bending one point. Pliers can help with adjustments.
What can you put on a wire hanger wreath?
You can use faux greenery, lightweight ornaments, ribbon, bells, pinecones, berries, floral picks, or a combination of these.
Can you make an ornament wreath with a wire hanger?
Yes. Lightweight ornaments can be arranged around a wire hanger frame. Make sure ornament caps and attachment points are secure.
How do you attach greenery to a wire hanger?
Floral or appropriate craft wire can be used to secure stems directly to the hanger frame. Tuck and bend sharp ends toward the back.
How do you make a wire hanger wreath fuller?
Layer different types of greenery, overlap stems, add small filler pieces, and use ornament clusters or decorative picks in sparse areas.
How do you hide the hanger hook?
Position a large bow or greenery around it, or incorporate the hook into the hanging arrangement depending on the design.
Can a wire hanger wreath go outside?
It can if the decorations, ribbon, attachment methods, and hanging hardware are suitable for the weather conditions.
Final Thoughts
A DIY wire hanger Christmas wreath is proof that holiday decorating doesn’t always need an expensive starting point.
A basic metal clothes hanger gives you the structure.
From there, you can make the wreath fit almost any Christmas style.
Cover it with greenery for something traditional.
Add burgundy velvet ribbon and brass-toned bells for a richer look.
Thread or attach colorful ornaments for something playful.
Or keep the design minimal with greenery along just part of the frame.
The biggest difference comes from the details.
Shape the hanger carefully, overlap your greenery, secure decorations to the actual frame, hide attachment points, and use a limited color palette.
Most importantly, pay attention to the wire itself. Cover or bend sharp ends, use appropriate tools, and make sure the finished wreath is securely hung.
With a few leftover Christmas decorations and a little time, an ordinary clothes hanger can become a festive wreath you’ll be happy to bring out again next year.

